
The system uses lists of values called option sets. An option set is a list of values.
Overview
When you set up your list you can specify the following attributes:
| Attribute | Description |
|---|---|
| Name | The name of the list. |
| System Name |
This is the unique system name for the list. When using an option set in formbuilder, execution engine plans etc this is the name by which the list is referred |
| Description | A useful description of the list which will help administrators understand how it is used in your implementation |
| Active | Can be used to set a list that is no longer used to inactive. This prevents the list being used to create new data but can still be used to refer to old links. |
| Is System | If set to On this indicates that the list is used internally within the system and should only be changed by a technical resource |
| Allow Hierarchy | Allows the values in the list to be hierarchical |
Each option set contain one or more values. Each value can have the following attributes.
| Attribute | Description |
|---|---|
| Name | The value that will be shown in the UI |
| ID |
A unique id for the value. This value should be used when referring to the value in execution engine plans or formbuilder |
| Short Name | A short name for the value |
| Meaning Code | Give an underlying condition or meaning for the value. So for example, a status of New, In Progress could all be given a meaning code of open. |
| Icon | The icon shown in the application where appropriate for the list item |
| Colour | The colour the list item will be shown in |
| Migration Code | The code that is used by an interface or data migration to link to the item |
| Active | Indicates whether the value is active or not. |

Striping Option Set Values
The concept of striping allows you to display data in the application depending on context. Striping can be applied to list view values. For example, You may only wish certain values to appear in a list if a certain user persona is viewing the list
Create option sets
Create an Option Set
You can create option sets in administration for use throughout the application.
- Select Launchpad > Go to Admin > Data Dictionary > Option Sets.
- Click New on the Option Set Management banner to open the Add new option set blade.
- Give your option set a Name and Description, the System Name field will automatically populate as you type.
- You can leave the toggle switches in their default positions unless you have specific requirements to change them.

Add a value to an option set
Add a Value to an Option Set
- Admin > Data Dictionary > Option Sets.
- In Manage Option Sets find the option set to which you want to add values and click on the Actions burger menu > Edit Values.
- This will open the Option Set Values blade.
- Click Add Option and enter the Name of your new option set value.
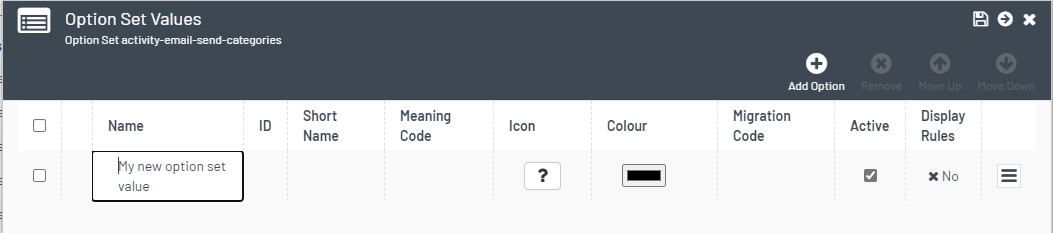
- Optionally enter any other information in the available fields.
| Column | Description |
|---|---|
| Name | The name of the option set - as will be displayed in the application |
| ID | The option set value id - used in items such as formbuilder to identify a unique value in the option set |
| Short Name | A shortened version of the option set value - can be used in reporting / documents etc |
| Meaning Code | Allows multiple values in the option set to be given a common meaning e.g. a status of In Progress or New may equate to a condition of 'Open' |
| Icon | An icon can be specified for each value |
| Colour | A colour can be specified for each value |
| Migration Code | Can be used to link to a legacy value - used for data migration or interfaces |
| Active | Indicates if the value is active |
| Display Rules | Indicates whether the option set value has any striping rules applied to it (contextual display) |
- When you have added all the required information, you can add another option set value by repeating steps 4-5.
- When you have added all your values, click Save.
Create Value Hierarchies
If you have set Allow Hierarchy to Yes on the Option Set, you can create levels of values.
For example you could create UK counties and the towns within them:

- Admin > Data Dictionary > Option Sets > Options burger menu > Edit Values
- Add Option to add each value
- The top level value needs to be above the values that belong to it in the hierarchy. Tick the box to the left of the top level value and select the Move Up icon until it is in the correct position and then untick.
- Tick all the values that are below in in the hierarchy and select the Indent icon, then untick.
- An arrow displays next to the top level value. Click on it to view the values within it.
- If your move a top level value, all sub level values move with it.
- You cannot delete a value that has sub level values.
Example create hierarchy values
This video shows how to create hierarchy values in option sets. It shows an example of creating a UK County and some towns within it. Creating the values, moving to the correct positions and indenting the lower levels to create a hierarchy. It also demonstrates that when you move a top level value, all the sub levels move with it and you cannot delete a value that has sub levels.
